To help you keep your data organized, you can merge data in Excel. You can merge worksheets from separate files, merge separate Excel files into one, or use the consolidate feature to combine your data instead. Here’s how to merge Excel files and data together using these methods.
How To Move Or Copy Single Worksheets In Excel
A typical Microsoft Excel file is broken up into different sheets (or worksheets) which are listed as tabs at the bottom of the Excel window. They act like pages, allowing you to spread data across multiple sheets in a single file. You can move or copy worksheets between different Excel files (or the same file, if you wish to duplicate your data sets).
To start, open your Excel file (or files). In the open window of the Excel file you wish to copy from, click on the worksheet you wish to select at the bottom of the Excel window. You can select multiple sheets by holding Shift and clicking on each sheet tab.
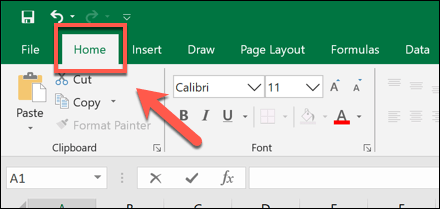
To begin copying or moving sheets, press the Home tab in the ribbon bar at the top.
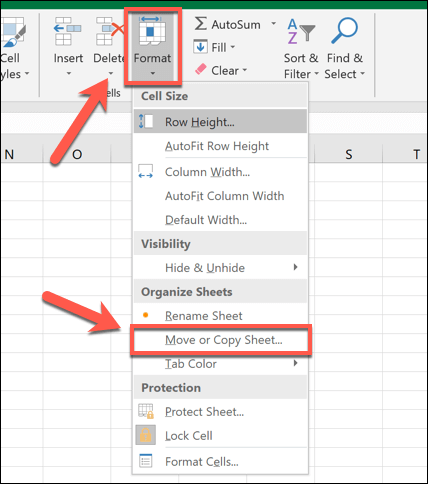
From here, click Format > Move or Copy Sheet.
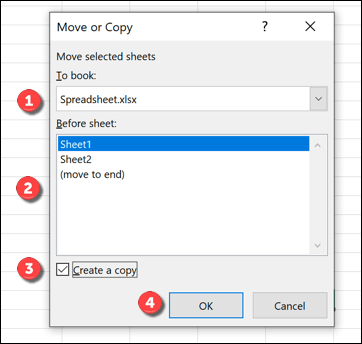
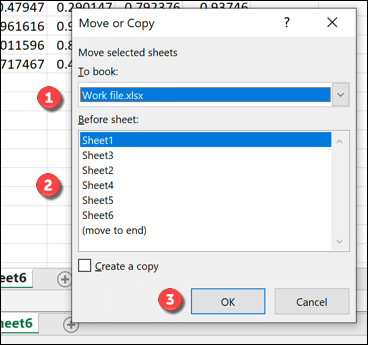
In the Move or Copy box, select the Excel file you wish to copy or move to from the To Box drop-down menu. Select where you wish to place the sheets in the Before Sheet section. By default, Excel will move the sheets—click the Create a copy checkbox if you’d prefer to copy them instead. Press OK to move or copy the worksheets once you’re ready.
The worksheets you selected will then be moved or copied, as desired, although this won’t merge them together entirely.
How To Merge Multiple Excel Files Together
You can use the Move or Copy Sheet tool in Excel to merge data in multiple Excel files together. You can do this by selecting all of the active worksheets in a file, then merging them into your single target file, repeating this process for multiple files.
To do this, open your Excel files. In the open window of an Excel file you wish to move or copy into another file, select all of the sheet tabs at the bottom of the window by holding the Shift key and clicking on each sheet tab.
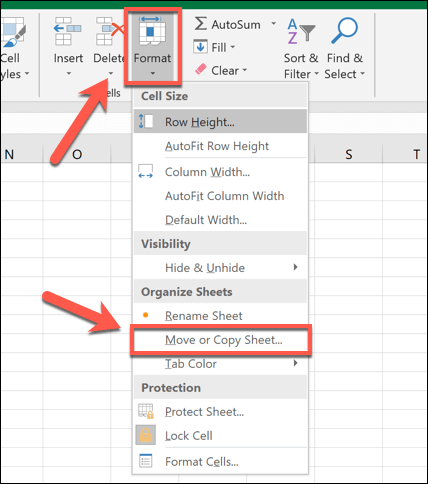
Next, press Home > Format > Move or Copy Sheet from the ribbon bar.
In the open Move or Copy dialog box, select the target Excel file to merge to from the To Box drop-down menu. Select where you wish to place your merged sheets in the Before sheet section. If you want to leave the original file intact, press Create a copy to copy the sheets rather than move them, then press OK to begin the moving or copying process.
If you have more than one Excel file, you’ll need to repeat these steps to merge them together into a single file.
Using The Consolidate Tool To Merge Data In Excel Together
Using the methods above, you can move and copy sheets between different Excel spreadsheet files. This moves the data, but it doesn’t integrate it particularly well—the data is still kept in separate sheets. To get around this problem, you can use the Consolidate tool in Excel to merge numerical data together from multiple worksheets into a new, single worksheet. Unfortunately, this process doesn’t work with cells using text—you’ll need to cut and paste this data manually, or create a VBA script in Excel to do it for you. For this to work, your data will need to be presented in the same way across your sheets with matching header labels. You’ll also need to delete any blank data (for instance, empty cells) from your data before you begin.
To merge data in Excel using this method, open your Excel files and, in the target Excel file for merging data, create a new worksheet by pressing the + (plus) button next to the sheet tabs at the bottom of the window.
In your new worksheet, press Data > Consolidate.
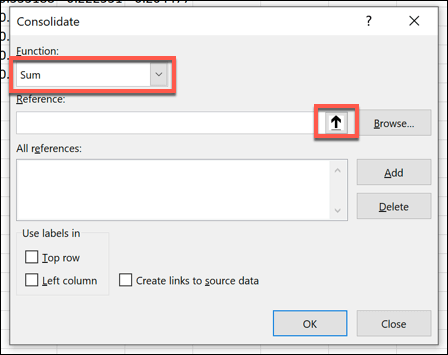
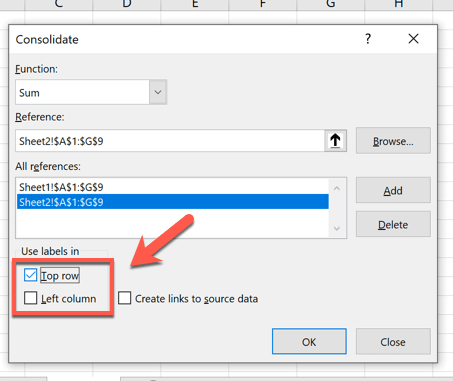
In the Consolidate window, make sure that Sum is selected in the Function drop-down menu. Click the button next to the Reference entry box to begin selecting your first data set—this is the data you wish to merge. You can also type the reference to the cell range in yourself, if you’d prefer.
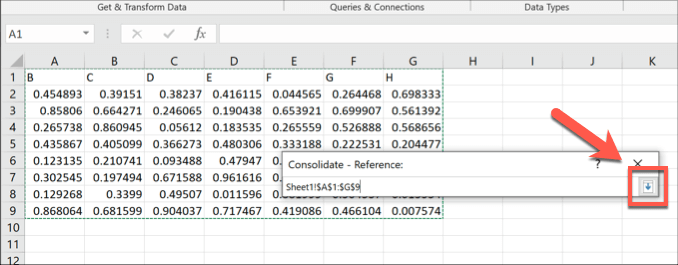
To select the data using your mouse, click on the sheet containing your worksheet once the Consolidate – Reference box is visible, select the data, then press the Insert button.
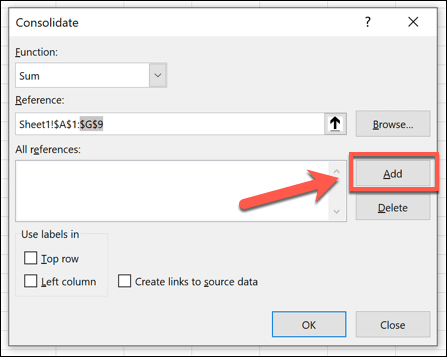
The cell range will appear in the Reference entry box—click the Add button to add it to the All References list.
Repeat the steps above to select additional sets of data, clicking Add to add each set to your sheet. If your data has column or row labels, make sure that these are processed correctly by pressing the Top row or Left column checkboxes in the Use labels section.
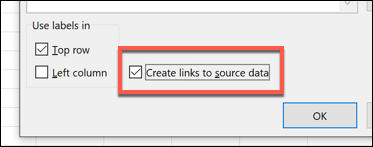
If you want to continue to edit the data in the original, separate worksheets, click to enable the Create links to source data checkbox. This will ensure that any changes to your original data are reflected in your merged sheet later.
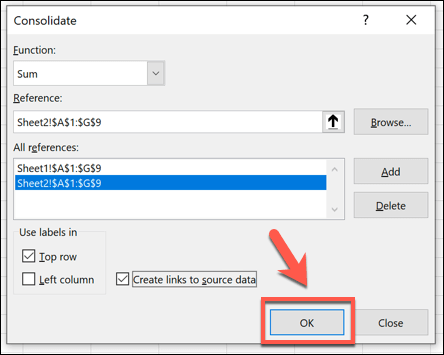
Once you’re ready to merge your data into a single sheet, press the OK button.
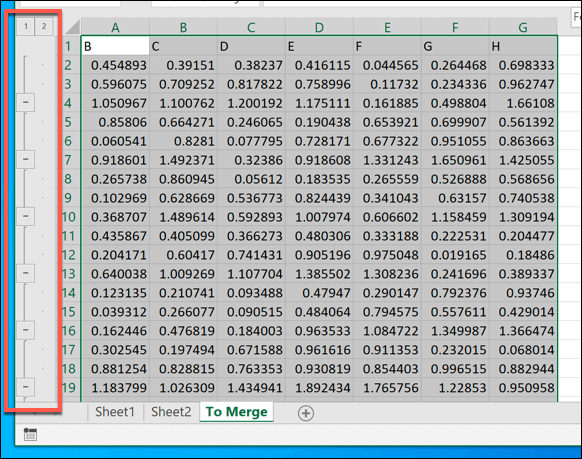
Your merged data will appear, with an options menu next to the row labels to be able to switch between different data views—click on these options (for instance, the 1 button) to hide or view the data you’ve merged in part or in full.
If you choose to create links to the source data, your new worksheet will act as a mirrored version of your separate sheets and files. Otherwise, your data will be copied into this sheet for you to edit directly.
Using Merged Excel Data
Whether you decide to merge data in Excel into a single sheet or a file, or if you prefer to spread your working across multiple files, these tips should help you to keep organized. When you’re ready, you can begin to share your Excel file with others to collaborate and analyze your data effectively as a team. If you’re worried about losing track of changes to your merged data, don’t worry—you can track changes in Excel easily using its built-in tracking feature. Let us know your Excel data analysis tips in the comments section below.
